DIY Auto Service: Cooling System Repair and Diagnosis by Symptom
Cooling System Maintenance
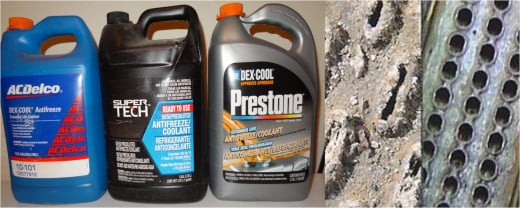
Cooling System Service
The biggest key to a cooling system without problems is maintaining the quality of the coolant. Acidic coolant can cause a host of cooling system problems because of the corrosion it causes. It can corrode gaskets, water pump impellers, liners, blocks, radiators, hoses, oil coolers, EGR coolers and heater core materials causing leaks.
Replacement of the cooling system components usually requires the draining of the cooling system. Because the coolant may be hot, check the temperature of the upper radiator hose before opening the cap. Once the system has drained the components can be replaced. Some coolant may still be lost at the components, so drain pans should be used to lessen the clean up.
Service Tip: Always follow the guidelines set up by the manufacturer of the engine for the proper service procedures to get the best results.
Truck and Trailer Systems Textbook
Caution
Hot coolant can cause severe burns. Always check the coolant temperature by feeling the upper radiator hose before opening the system. The release of pressure could cause the water in the coolant to boil and turn into a scalding geyser.
Draining and Refilling the Cooling System
Draining the Cooling System
To drain the cooling system, a drain plug (petcock) is usually located on the bottom of the radiator. Before opening the drain plug, check to see what the coolant capacity is and that the drain pan is of sufficient capacity.
To drain the coolant:
-
Open the radiator cap if the coolant is not hot.
-
Open the drain valve (petcock) on the bottom of the radiator. If the lower radiator hose extends below the radiator, there may be a drain plug on this hose also.
Service Tip: If the upper portion of the engine is being worked on, there may be no need to drain the entire cooling system volume. Just drain until the coolant level is below the components. If the engine is being removed, the coolant plugs on the side of the block can be used to drain the block.
Refilling the Cooling System;
-
Premix the recommended ethylene glycol (EG) or extended life coolant (ELC) and water to the recommended mix (50/50) ratio or use a premixed coolant.
-
Make sure all drains are closed and plugs reinstalled.
-
Use a funnel to fill the de-aeration tank. It may fill then drain several times as the coolant works its way into the block and radiator.
-
If the system does not use a de-aeration tank, bleeder plugs may need to be removed from around the thermostat housing at the top of the cooling system. Some engines use a special procedure like quickly accelerating the throttle several times. This allows the air to be “bled” out. Follow the procedure for the vehicle you're working on.
-
Once the system is full, start the engine and run it for a short time.
-
Refill the system to the full “COLD” mark.
-
Start and run the engine until it warms up to operating temperature.
-
To bring the engine to operating temperature a road test of the vehicle may be necessary.
-
Observe the coolant level. It should be close to the full “HOT” mark.
Service Tip: The de-aeration tank has bleed hoses connected to the thermostat housing and the top of the radiator. This should bleed the air from the cooling system so the block and radiator stay full of coolant.
Thermostat Replacement
The thermostat(s) is located in the thermostat housing where the upper radiator hose connects to the engine or with reverse cooling at the lower radiator hose and water pump.
The cooling system may only need to be drained part way to remove it. Unbolt the thermostat housing to remove the thermostat(s). Most gas engines use one and others (diesel) use two thermostats. Compare the old and new thermostats. The opening temperature is usually marked on the thermostat. Replace the old with a new thermostat of the same temperature rating. Some thermostats use an o-ring type seal while others sit in a cut-out and use a gasket. Make sure the thermostat is facing the right direction and sitting in the cut-out properly. When tightening the housing, make sure the housing isn’t cocked indicating the thermostat has moved. Check the hose for soft spots and the condition of the inside of the hose. Now would be a good time to install a new upper hose if needed.
Radiator Replacement
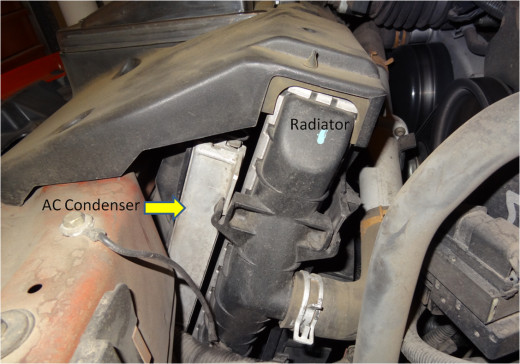
Radiator Replacement
Cars and light trucks are using a lot of plastic/aluminum radiators. Breaking a plastic tab or line connection off of the radiator is a concern. The radiator mounting typically also supports the fan shroud, charge air cooler (CAC with turbocharger) and the AC condenser. With electric fans, the fans may also mount to the radiator.
To remove the radiator, the cooling system will have to be drained all the way. Depending on the vehicle model, the grill, fan shroud and fan (electric or mechanical) may need to be removed to remove the radiator. Carefully remove the upper hose, lower hose and any vent hoses without damaging the hose connection fittings. Some radiators have transmission and engine oil coolers built into the tanks. Oil lines will need to be removed from the radiator fittings.
The radiator usually sits in rubber mounts or the radiator bracket is bolted to the vehicle core support. Disconnect or remove the fan shroud, CAC and AC condenser as necessary. Support the radiator and remove the mounts. Remove the radiator carefully so as not to damage it.
Reinstall the radiator on its mounts and make sure there is no contact that could rub through the radiator. Reconnect the mounts, fan shroud, CAC, AC condenser and coolant hoses.
Refill the cooling system as covered earlier.
Camaro V8 Water Pump
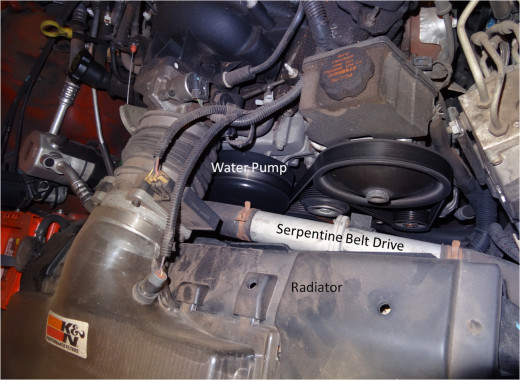
Water Pump Replacement
The most common reason for replacing a water pump is coolant leaking from the weep hole.Because there are different types of water pumps (Serpentine belt driven and timing belt driven), there are different types of procedures for removal. All types require the complete draining of the cooling system. After the pump has been replaced, refill the cooling system.
Serpentine Belt Driven Water Pumps
Some water pumps shafts are also used for the mechanical fan. Four bolts holding the fan on used to be popular. Today a lot of mechanical fans are screwed onto the water pump shaft with REVERSE threads especially on GM and Dodge Pickups. This means you loosen it to clockwise and tighten it counterclockwise. Loosen the fan before removing the belts.
Because these water pumps are driven by belts, the fan belts will need to be removed. Most vehicles today use serpentine belts to drive the accessories, including the water pump. If there is not a serpentine belt diagram on the vehicle, make one up. Using a breaker bar on the automatic tensioner, remove the tension from the belt and remove the belt from one of the pulleys (alternator). The water pump has a pulley that may bolt on or is pressed on. Check the new water pump to see if it comes with the pulley. It may be necessary to reuse the pulley on the new water pump. Some pulleys require a special tool to remove and install the pulley without damaging it.
Once the belt is removed, the water pump is held in by a number of bolts. Keep track of the location of the bolts as some applications use several length bolts in special locations. An o-ring or gasket is used to seal the water pump to the block or gear case. Remove the water pump and clean the surface of the block or gear case. Remove all the old gasket material but, be careful not to gouge the surface as this could cause a leak. Install the pump with a new gasket or o-ring. Install the bolts in the proper location and torque to specifications.
Using the breaker bar in the tensioner, reinstall the belt with the proper routing. If V-belts are used, adjust the belt tension and check it with a tension gauge.
Timing Belt Driven Water Pump
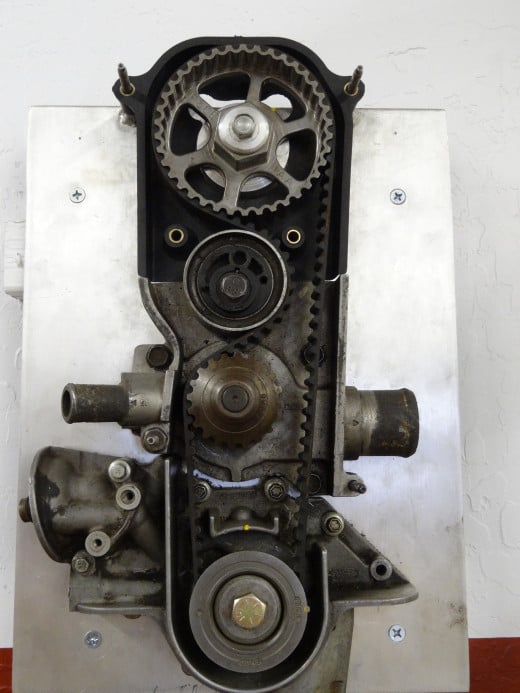
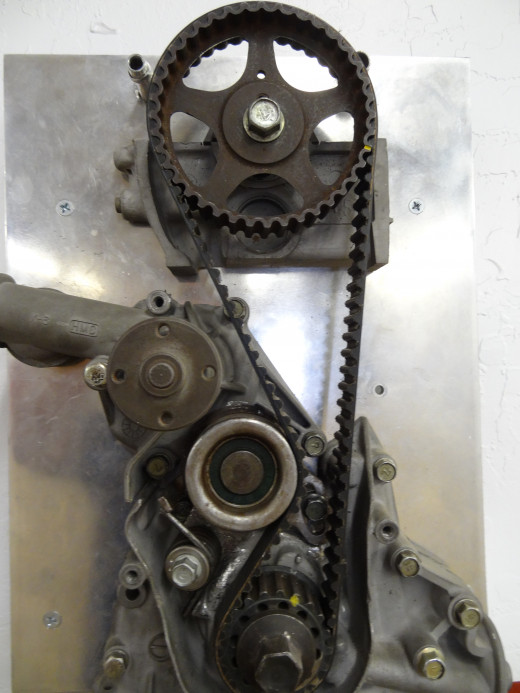
Some overhead cam engines use the water pump shaft as an idler pulley for the timing belt. This means to replace the water pump the timing belt must be removed. Do not start this project without the service information regarding the timing belt replacement. It also makes sense to replace the water pump if you are doing the timing belt and vice versa. Many times after replacing the timing belt, a short time later the water pump starts leaking.
Bring the engine to the timing position following the factory procedure before disassembly. Disassemble the front of the engine to remove the timing belt. Depending on the engine mount design, the engine may need to be supported.
With the timing belt removed, unbolt and replace the water pump. Install the new water pump with a new gasket or O-ring. Install the timing belt over the water pump pulley.
Use the factory procedure to time the cam(s) while installing the timing belt. Once installed and adjusted, rotate the engine two turns in the normal direction of rotation and recheck the timing marks. Do not turn the engine backwards.
Finish the front of the engine and refill the cooling system.
Service tip: Do not rotate the engine while the timing belt is off as this could bend valves on an interference fit engine.
Timing Belt Driven Water Pump
Common Cooling System Problems
Engine Running Hot or Overheating
The engine temperature is controlled by coolant flow thru the engine to the radiator. The heat is given off (radiated) to the air. Anything that will affect either of these will cause the temperature to go up.
-
Always check the coolant level first. Low coolant level usually means a coolant leak. Pressure test the cooling system.
-
Thermostats stuck closed or restricted limit the flow to the radiator. Is the upper radiator hose hot indicating flow to the radiator? If not drain the cooling system and replace the thermostats.
-
Restricted airflow through the radiator. Is the radiator core blocked with dirt or have the fins been bent over? Are there fins missing? Clean the radiator, straighten the fins with a fin comb or have the radiator repaired.
Service Tip: Because the AC condenser and charge air cooler (CAC) are in front of the radiator they also could be causing the blockage. Make sure they are also clean.
-
Restricted coolant flow thru the radiator. The tubes in the core could become blocked. This usually happens when the coolant has not been maintained or if the wrong coolants (EG and ELC) are mixed together. Use an infrared thermometer to measure the temperature of the tubes from the hot side to the cool side with the engine running. There should be a consistent temperature drop on all the tubes. Cooler tubes indicate less flow (restricted). Send the radiator out to be checked or unsoldered and “rodded out”.
-
Water pump impellers can become eroded and not be able to pump the coolant. The silicate level in the coolant could cause the impeller to be sandblasted as the coolant is circulated. Improper SCA levels on diesel engines and acidic coolant with high levels of silicate can be the cause. Replace the water pump and flush the cooling system.
-
The coolant fan not engaging would cause low airflow through the radiator. This would especially be noticed at lower vehicles speeds and in stop and go driving situations. Check the fan clutch for play and leakage. Most fan relays for electric fans are controlled by the engine ECM. Using a scan tool or OEM software, check the status of the fan on or off in the software. Also look at the coolant temperature, AC pressure and intake air temperature to see if the sensors are reporting the correct information. The scan tool or software may also give you the ability to request the fan on and off.
Service Tip: A coolant fan problem may also affect the AC operation (high, high side pressure) and reduce engine power because of the lack of airflow through the turbocharger CAC (high intake air temperature) at low speeds.
Engine Running Cold or No Heat to Cab
The engine temperature is controlled by the opening and closing of the thermostats. If the thermostats are stuck open, the coolant is sent to the radiator all the time. This could cause the engine to take a longer time to warm up or not allow the engine to warm up at all to provide heat.
-
Always check the coolant level first. Because the heater core is usually high in the cooling system, it will be starved for coolant flow. Low coolant level usually means a coolant leak. Pressure test the cooling system.
-
Check the upper hose as the engine starts to warm up. If the hose is warm before the engine reaches the opening temperature of the thermostat, it is not closing as it should. Replace the thermostat.
Coolant Leaks
Many times the leaking coolant is visible and usually leaves a white trail leading to the source. Pressure testing the cooling system will usually help to spot the leak. Sometimes it’s better to leak check the cooling system cold, before it warms up. The water pump weep hole leak may leak at one time then not leak at another. Look for the white trail coming from the weep hole. If found replace the pump.
Internal coolant leaks that have either shown up on an oil analysis or have turned the oil into coffee with cream are harder to find. Four prime candidates could be the cause; diesel liner seals, oil cooler, EGR cooler and head gasket.
-
Liner seals are used with diesel wet liners. They seal the removable liners to the block. The lower seals if leaking would usually leak into the crankcase. Liner seals also will not push oil into the cooling system. To find this leak, remove the oil pan and pressure test the cooling system. With pressure on the cooling system coolant should drip from between the bottom of the liner and the block. The engine will need to be torn down and the liner seals replaced. Typical cause is acidic coolant.
-
Oil cooler heat exchanger or o-ring failure will push coolant into the oil and oil into the coolant. If coolant is found in the oil, check if there is a slimy coating at the top of the cooling system. When the engine is off, the cooling system maintains pressure and will push coolant into the lube system. When the engine is running, the higher oil pressure will push engine oil into the cooling system.
-
EGR cooler failure on a diesel engine will allow coolant into the air intake of the engine. This will usually also cause white smoke out of the exhaust as the cylinder burns the coolant. Because of the white smoke this may be confused with a head gasket problem. The coolant would be in all of the cylinders. While pressure testing the cooling system, remove the exhaust and intake pipe from the cooler. If there is evidence of coolant, replace the cooler.
-
Head gasket leaks will leak coolant into the cylinder. The coolant will drain past the rings and make it into the crankcase. A sweet smelling white smoke out the exhaust will also accompany the coolant in the oil. The source of the coolant could be a blown head gasket, cracked head or warped head. This leak usually occurs into one or two cylinders.


